Scenario
Fixed asset imports fall into two distinct workflows—one for new assets and one for mid-life assets—and this guide covers the mid-life track. Mid-life assets are those that are already partially or fully depreciated at the time of import and must therefore carry prior depreciation history. This guide provides step-by-step instructions on using CSV imports to upload mid-life fixed assets, configure their depreciation schedules, and attach alternate depreciation.
Solution
Pre-Import System Configuration:
Before uploading mid-life fixed assets, you must update two specific settings in NetSuite to facilitate the CSV import.
- Navigation Path: Go to Fixed Assets > Setup > System Setup.
- Required Action: Under the Asset Setup section, uncheck the following two boxes:
- “Run Server Scripts on CSV Import”
- “Allow Asset Value Editing”
💡Note: The “Run Server Scripts on CSV Import” setting resets Asset Values and should also be used when creating new Fixed Assets.
💡Note: If “Run Server Scripts on CSV Import” remains selected, the system will prevent the mid-life fixed asset upload from processing successfully.
Important: You can successfully import New Fixed Assets with the checkbox disabled by including the 'Current Net Book Value' field and ensuring it is populated with a value. If this field is omitted or left blank, the system defaults the net book value to 0, causing the asset to fully depreciate in a single run. This alternative approach is particularly advantageous during research or implementation testing when regularly importing both new and mid-life assets, as it eliminates the need to continuously toggle the setting.
Phase 1: Uploading Mid-life Fixed Assets
1. CSV Import File Fields:
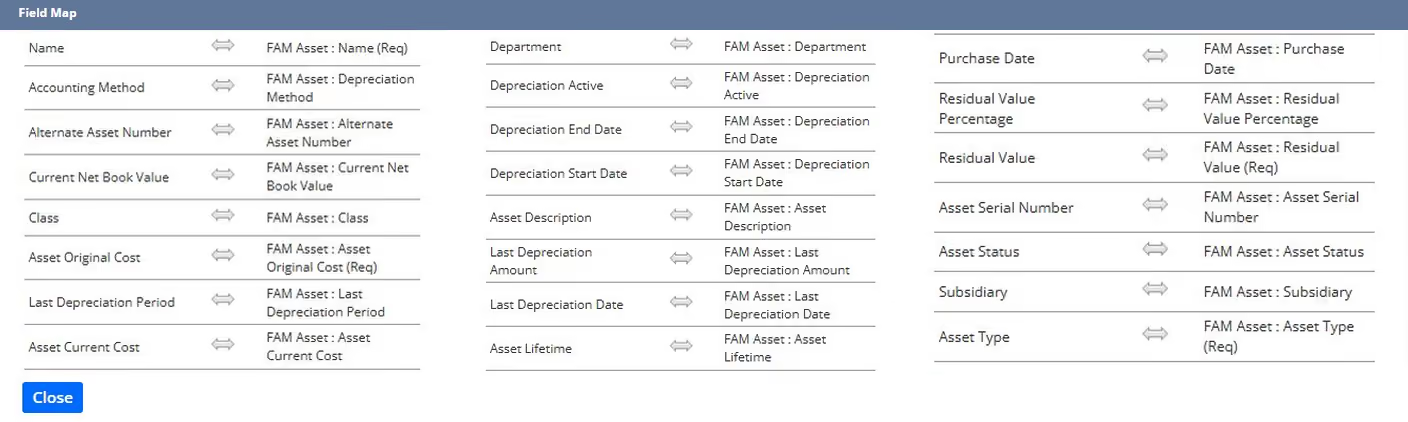
Open a new Excel spreadsheet to build your CSV import template. You can include optional NetSuite fields alongside the fixed asset columns listed below. While you are free to customize the file, it must contain all mandatory fields from the NetSuite "Fixed Asset" form (for example, add "Location" if it is mandatory on your "Fixed Asset" form):
Those are the same fields that you will see when you try to create a fixed asset using the UI page.
Important: Before importing, please verify that your asset financials reconcile perfectly as of the cut-off date (Original Cost minus Cumulative Depreciation must equal Net Book Value). If there are any mathematical imbalances or inconsistent dates, the import will be inaccurate. Because these fields cannot be edited post-upload, you will be forced to delete the asset entirely and re-import it.
- Save your completed Excel spreadsheet as a CSV (Comma delimited) (*.csv) file.
- CSV Import
Navigation Path: Go to Setup > Import/Export > Import CSV Records.
Set Scan & Select Options: In the Import Assistant, select the following classifications:
- Import Type: Custom Records
- Record Type: FAM Asset
- File Selection: Choose the CSV file you just saved, then click Next.
Choose Data Handling: Select Add as your data handling option.
Configure Advanced Options (Critical Step)
Click to expand the Advanced Options menu.
Check the box for “Run Server SuiteScript and Trigger Workflows”.
Important: Checking this box allows NetSuite's background server scripts to automatically populate key asset fields that are normally grayed out and cannot be mapped manually or directly through a CSV file.
Click Next.
Map the Fields
The Layout: Your CSV headers will appear on the left, NetSuite destination fields on the right, and the current mappings in the middle.
Action: Review the auto-generated mappings. Any required or missed fields will be highlighted in red; manually drag and drop your CSV columns to map them to the correct NetSuite fields.
Click Next once all required fields are mapped.
Name and Save the Import:
Provide a descriptive name for this import map (e.g., FAM Asset Upload).
Saving this map allows you to bypass the mapping process and reuse it for all future fixed asset uploads.
Click Save & Run.
Phase 2: Uploading Depreciation History
Once your fixed assets are successfully uploaded and visible in the Asset list, you must upload their historical depreciation data. This ensures your mid-life assets carry their cumulative historical value without triggering past general ledger (GL) postings during the next Depreciation Run.
- CSV Import File Fields
Open a new Excel spreadsheet and create a template using the following specific columns:
- Once completed, save the Excel file as a CSV (Comma-delimited) (*.csv).
- CSV Import
Navigation Path: Go to Setup > Import/Export > Import CSV Records.
Set Scan & Select Options: In the Import Assistant, select the following classifications:
- Import Type: Custom Records
- Record Type: FAM Depreciation History
- File Selection: Choose the CSV file you just saved, then click Next.
Choose Data Handling: Select Add or Update as your data handling option.
Configure Advanced Options (Critical Step)
Click to expand the Advanced Options menu.
Check the box for “Run Server SuiteScript and Trigger Workflows”.
Click Next.
Map the Fields
The Layout: Your CSV headers will appear on the left, NetSuite destination fields on the right, and the current mappings in the middle.
Action: Review the auto-generated mappings. Any required or missed fields will be highlighted in red; manually drag and drop your CSV columns to map them to the correct NetSuite fields.
Note: You can include the asset name in your upload file to make it easier to read, but it will not be mapped into the system and will be left unmapped (marked in red). Don't worry, the Asset Internal ID is the primary identifier the system uses to match and differentiate the records.
Click Next once all required fields are mapped.
Name and Save the Import
Provide a descriptive name for this import map (e.g., FAM Depreciation History Upload).
Saving this map allows you to bypass the mapping process and reuse it for all future fixed asset uploads.
Click Save & Run.
- Verifying the Import
After the import completes successfully, you should verify that the records were updated correctly:
- Navigate to the specific asset's record page.
- Click on the Depreciation History tab.
- Open the newly added history record to confirm that the cumulative depreciation has been recorded as the initial depreciation transaction.
Important: Ensure that this entry acts strictly as a historical record baseline and has not generated an actual, duplicate posting to your General Ledger.
Phase 3: Uploading Alternate Depreciation
Beyond primary book depreciation, assets often require independent alternate schedules for tax or statutory reporting (such as Federal or State tax). These schedules do not post to your General Ledger, allowing a single asset to track multiple tax jurisdictions simultaneously. This phase covers how to upload these alternate depreciation baselines for the mid-life assets created in Phase 1.
- CSV Import File Fields
Open a new Excel spreadsheet and create a template using the following columns. Each row represents one alternate depreciation schedule for one asset, so an asset that is reported under two methods will have two rows (sharing the same Asset Internal ID and ID but differing in the Alternate Method):
- Once completed, save the Excel file as a CSV (Comma delimited) (*.csv).
- CSV Import
Navigation Path: Go to Setup > Import/Export > Import CSV Records.
Set Scan & Select Options: In the Import Assistant, select the following classifications:
- Import Type: Custom Records
- Record Type: FAM Alternate Depreciation
- File Selection: Choose the CSV file you just saved, then click Next.
Choose Data Handling: Select Add or Update as your data handling option.
Configure Advanced Options (Critical Step)
Click to expand the Advanced Options menu.
Check the box for “Run Server SuiteScript and Trigger Workflows”.
Click Next.
Map the Fields
The Layout: Your CSV headers will appear on the left, NetSuite destination fields on the right, and the current mappings in the middle.
Action: Review the auto-generated mappings, paying particular attention to the Asset Internal ID and Alternate Method fields. Any required or missed fields will be highlighted in red; manually drag and drop your CSV columns to map them to the correct NetSuite fields.
Note: You can include the asset name in your upload file to make it easier to read, but it will not be mapped into the system and will be left unmapped (marked in red). Don't worry, the Asset Internal ID is the primary identifier the system uses to match and differentiate the records.
Click Next once all required fields are mapped.
Name and Save the Import
Provide a descriptive name for this import map (e.g., FAM Alternate Depreciation Upload).
Saving this map allows you to bypass the mapping process and reuse it for all future alternate depreciation uploads.
Click Save & Run.
Important: If you are reusing a saved CSV file from a previous environment or a prior asset batch, update the internal IDs (and any file/record IDs) in the file before importing. Leaving the old IDs in place can cause the import to fail or attach the alternate depreciation to assets that already exist, producing errors that are difficult to unwind.
- Verifying the Import
After the import completes successfully, confirm that the alternate schedules are attached to the correct assets:
- Navigate to the specific asset's record page.
- Open the Alternate Depreciation (or Alternate Methods) tab.
- Confirm that each alternate method you uploaded appears as its own entry, with the correct cost, net book value, and residual value.
Phase 4: Running Depreciations
Now that your asset records, historical depreciation, and alternate schedules are successfully uploaded, you are ready to begin the live depreciation process. This step calculates the next scheduled depreciation expense and generates the corresponding journal entries in your General Ledger (GL). Note that this applies to book/accounting depreciation only; alternate schedules continue to serve strictly as non-posting baselines for tax and statutory reporting.
Navigation Path: Go to Fixed Assets > Transactions > Asset Depreciation.
Required Parameters: Before executing the run, select the appropriate filters on the screen:
- Asset Group: Select the specific category or group of assets you want to depreciate.
- Subsidiary: Choose the target subsidiary associated with these assets.
- Period End Date: Set the effective date as of which the current depreciation should be calculated and posted.
Post-Execution Verification
Once the processing status completes, you can verify that NetSuite has seamlessly picked up where your mid-life historical upload left off:
- Navigate back to a processed asset's record page.
- Select the Depreciation History tab.
- Review the line items—you will now see the Journal Entries generated by the system, confirming that automated monthly GL postings have officially commenced.
- Select the Alternate Depreciation history tabs.
- Verify that the system calculates the depreciation amount without generating or posting any General Ledger journal entries.